This article may contain affiliate links. If you make a purchase through these links, we may earn a commission at no extra cost to you.
E-commerce is booming, and many entrepreneurs strive to open online stores. Shopify is the most used e-commerce platform in creating and managing an online store. It offers an intuitive user interface with powerful features and a heap of customization options so that you could tailor your online store according to your wish.
This comprehensive guide will lead you through every step related to setting up your Shopify store and optimizing it for success.
Table of Contents
- Why Choose Shopify?
- Setting Up Your Shopify Account
- Choosing the Right Shopify Plan
- Customizing Your Store’s Design
- Adding Products to Your Store
- Configuring Payments and Shipping
- Launching Your Shopify Store
- Marketing Your Store
- Monitoring and Optimizing Your Store
- Summary
Why Choose Shopify?
Before diving into the setup process, it’s essential to understand why Shopify is a top choice for many entrepreneurs:
- Ease of Use: Shopify is known for its intuitive interface, making it accessible for beginners.
- Scalability: Whether you’re starting small or growing big, Shopify can scale with your business.
- Customization: With hundreds of themes and thousands of apps, you can tailor your store to fit your brand perfectly.
- Support: Shopify offers 24/7 customer support, extensive documentation, and a vibrant community.
Setting Up Your Shopify Account

Step 1: Sign Up for Shopify
- Visit Shopify’s Website: Go to Shopify’s homepage.
- Start Your Free Trial: Click on the “Start free trial” button. Shopify offers a 14-day free trial to test out the platform.
- Enter Your Details: Provide your email address, create a password, and choose your store name.
Ensure your store name reflects your brand and is easy to remember.
Step 2: Complete the Setup
- Business Information: Fill in the required details about your business, including address, contact information, and store type.
- Select Your Industry: This helps Shopify provide relevant tips and templates.
Choosing the Right Shopify Plan
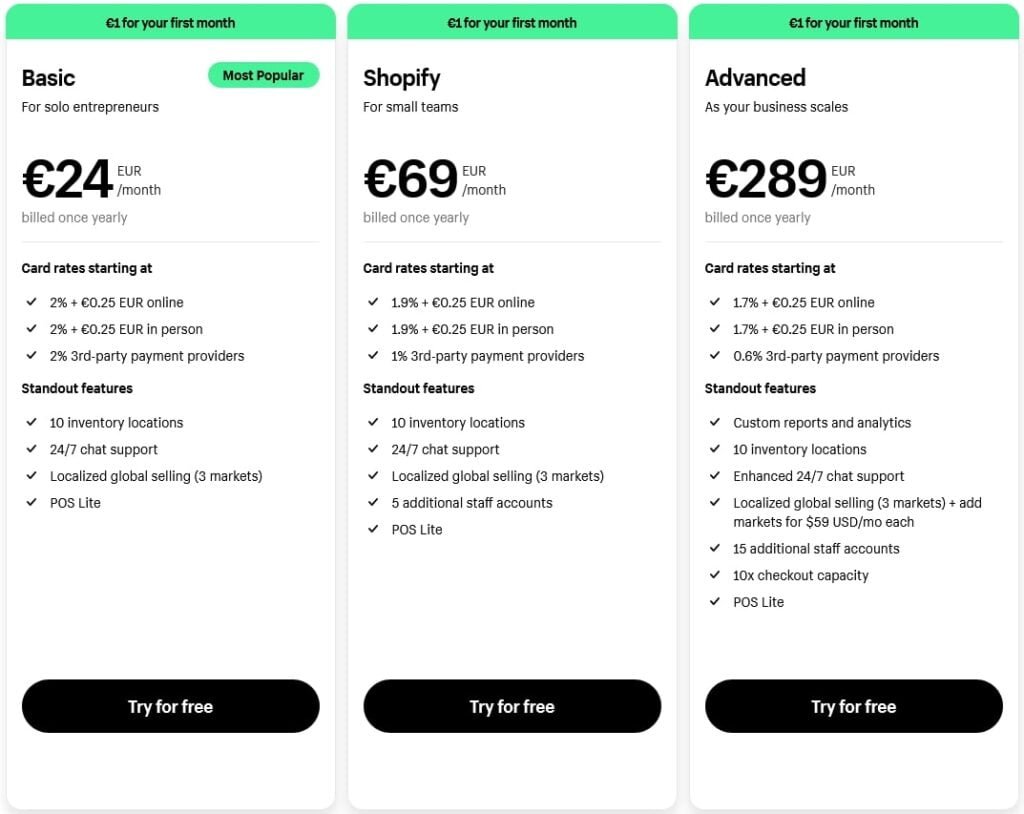
Shopify offers several pricing plans. Choosing the right one depends on your business needs:
- Basic Shopify: Ideal for new e-commerce businesses with basic requirements.
- Shopify: Suitable for growing businesses needing advanced features.
- Advanced Shopify: Best for scaling businesses requiring detailed reporting and lower transaction fees.

Tip: Start with the Basic plan and upgrade as your business grows.
Customizing Your Store’s Design
1. Choose a Theme
- Visit the Theme Store: Go to Shopify’s Theme Store and browse through the free and paid themes.
- Preview and Select: Preview themes to see how they fit your brand.
Once you find one you like, select and install it.
2. Customize Your Theme
- Access Theme Settings: Go to your Shopify dashboard, click on “Online Store,” and then “Themes.”
- Personalize Your Store: Use the drag-and-drop editor to customize your theme. Modify colors, fonts, and layouts to match your brand identity.
3. Add Essential Pages
- Create Key Pages: Add important pages such as About Us, Contact Us, Privacy Policy, and Terms of Service.
- Ensure Navigation: Make sure these pages are easily accessible through your store’s navigation menu.
Adding Products to Your Store
1. Add Product Details
- Go to Products: From your Shopify dashboard, click on “Products” and then “Add product.”
- Enter Product Information: Provide detailed product information, including title, description, price, and SKU.
- Upload Images: Add high-quality images to showcase your products effectively.
2. Organize Your Products
- Create Collections: Group similar products into collections (e.g., Men’s Clothing, Women’s Accessories).
- Tag Products: Use tags to help customers find products through search and filters.
Configuring Payments and Shipping
1. Set Up Payment Gateways
- Visit Settings: Go to “Settings” and then “Payments.”
- Choose Payment Methods: Shopify supports various payment gateways, including Shopify Payments, PayPal, and third-party providers.
- Configure Settings: Enter necessary information to set up payment processing.
2. Configure Shipping Options
- Go to Shipping Settings: Under “Settings,” click on “Shipping and delivery.”
- Set Shipping Rates: Define shipping zones and rates based on your business model.
- Offer Free Shipping: Consider offering free shipping to incentivize purchases.
Launching Your Shopify Store
1. Review Your Store
- Test All Features: Ensure all features, such as checkout, payment processing, and mobile responsiveness, work flawlessly.
- Check Legal Requirements: Verify that your store complies with legal requirements, including terms of service and privacy policies.
2. Remove Password Protection
- Disable Password: Go to “Online Store” and then “Preferences.” Remove password protection to make your store live.
Marketing Your Store
1. Utilize Shopify’s Marketing Tools
- Email Marketing: Use Shopify’s built-in email marketing tools to create and send newsletters.
- Social Media Integration: Connect your store to social media platforms to reach a broader audience.
2. Implement SEO Best Practices
- Optimize Product Pages: Use relevant keywords in your product titles and descriptions.
- Create Blog Content: Start a blog to drive organic traffic and engage with your audience.
3. Run Paid Advertising
- Google Ads: Set up Google Ads campaigns to target potential customers searching for your products.
- Social Media Ads: Utilize Facebook and Instagram ads to reach a wider audience.
Keeping an Eye on and Improving Your Shop
1. Track Your Performance
- Use Analytics Tools: Shopify has its own tools to see how well your shop is doing.
- Analyze Key Metrics: Keep an eye on how much you’re selling, how many people visit, how often they buy, and what they do when they’re in your shop.
2. Make Changes Using the Information
- Identify Trends: Use the data from your analysis to find out which products and ways of advertising are working best.
- Make Informed Decisions: Change what you sell, how much you charge, and how you advertise based on the information about how your shop is doing.
Summary
Setting up an online shop using Shopify is simple because it has an easy-to-use design and lots of helpful tools. Just follow this basic guide, and you’ll be able to create, personalize, and start your store easily.
Keep in mind that the secret to doing well is always learning and changing to fit what your customers want.
Enjoy your sales!


